http://www.3vcambodia.com/productDetail.php?cateID=28&productID=152


អាស័យដ្ឋានៈ ទីតាំងទី១ នៅទល់មុខសាលាសូភី ខាងជើងភ្លើងស្តុប៧០ម៉ែត្រ ក្រុងសិរីសោភ័ណ ខេត្តប.ជ ។
Tel: 012 89 52 53 / 098 353 555 | E-mail: Sekmeas_bmc@yahoo.com

អាស័យដ្ឋានៈ ទីតាំងទី២ នៅទល់មុខបឹងស្នោ ជាប់សាលាសំរោង ក្រុងសំរោង ខេត្តឧត្តរមានជ័យ ។
Tel: 012 700 599 / 088 8 001 001 | E-mail: Sekmeas_omc@yahoo.com

អាស័យដ្ឋានៈ ទីតាំងទី៣ នៅទល់មុខវិទ្យាល័យអន្លង់វែង ផ្លូវទៅព្រះវិហារ ស្រុកអន្លង់វែង ខេត្តឧត្តរមានជ័យ ។
Tel: 012 433 588 / 088 474 5555 | E-mail: Sekmeas_len@yahoo.com
អាស័យដ្ឋានៈ ផ្លូវលេខ ៣ ពីការាស់សាំងសូគីមិច ប្រហែល100ម៉ែត្រ ក្រុងសិរីសោភ័ណ ខេត្តបន្ទាយមានជ័យ ។
Tel: 065 5 600 500 / 088 888 38 48 / 016 733 622 (world sticker)
 OPTION ONE
1. Press and hold Ctrl+Shift while opening the program.
2. If prompted by UAC, then click on Yes to apply permission to allow the program to run with full permission as an Administrator.
NOTE: If you are doing this is while logged in as standard user instead of an administrator, then you will need to provide the administrator's password before the program will run as administrator.
OPTION TWO 1. Right click on the program's shortcut or an .EXE file, BAT file, CMD file, or MSI file, and click on Run as administrator. (see screenshot below)2. If prompted by UAC, then click on Yes to apply permission to allow the program to run with full permission as an administrator.
NOTE: If you are doing this is while logged in as standard user instead of an administrator, then you will need to provide the administrator's password before the program will run as administrator.
OPTION THREE 1. Right click on the icon of the pinned program on the taskbar to open it's Jump List. (see screenshot below)
2. In the Jump List, right click on the program's name, and click on Run as administrator. (see screenshot below)3. If prompted by UAC, then click on Yes to apply permission to allow the program to run with full permission as an Administrator.
NOTE: If you are doing this is while logged in as standard user instead of an administrator, then you will need to provide the administrator's password before the program will run as administrator.
OPTION FOUR 1. Type in the file name (ex: cmd) of the program that you want to run elevated. (see screenshot below)2. Do either step 3 or 4 below.
3. Press Ctrl+Shift+Enter to open the program (ex: cmd) elevated, and go to step 5 below.
OR
4. Do OPTION TWO as above to right click on the program (ex: cmd) in the search results at the top of the Start Menu, and click on Run as administrator. (see screenshot below step 1)
5. If prompted by UAC, then click on Yes to apply permission to allow the program to run with full permission as an Administrator.
NOTE: If you are doing this is while logged in as standard user instead of an administrator, then you will need to provide the administrator's password before the program will run as administrator.
OPTION FIVE 1. Right click on the program shortcut or program .exe file, then click on Properties, and on the Compatibility tab. (see screenshots below)
NOTE: If you are doing this while logged on as a standard user instead of an administrator, then you will need to also click on the Change settings for all users button and type in the administrator's password.2. To Always Run this Program as an Administrator
A) Check the Run this program as an administrator box, and click on OK. (see screenshots above)3. To Not Always Run this Program as an Administrator
A) Uncheck the Run this program as an administrator box, and click on OK. (see screenshots below step 1)4. Open the program.
5. If prompted by UAC, then click on Yes to apply permission to allow the program to run with full permission as an administrator.
NOTE: If you are doing this is while logged in as standard user instead of an administrator, then you will need to provide the administrator's password before the program will run as administrator.
OPTION SIX 1. Right click on a shortcut that you want to run as administrator, and click on Properties.
2. Click on the Shortcut tab for a program shortcut, then cllick on the Advanced button. (see screenshot below)3. To Always Run this Specific Shortcut as an Administrator
A) Check the Run as administrator box, and click on OK. (see screenshot below)4. To Not Always Run this Specific Shortcut as an Administrator
A) Uncheck the Run as administrator box, and click on OK. (see screenshot above)5. Click on OK. (see screenshot below step 2)
6. Open the program.
7. If prompted by UAC, then click on Yes to apply permission to allow the program to run with full permission as an Administrator.
NOTE: If you are doing this is while logged in as standard user instead of an administrator, then you will need to provide the administrator's password before the program will run as administrator.
OPTION SEVEN 1. For how, see:How to Create a Elevated Program Shortcut without a UAC Prompt
OR
How to Create a Elevated Program Shortcut a Standard User is able to Run in Windows 7
OPTION EIGHT 1. For how, use the RUNASADMIN value with the full path to the program's file in OPTION THREE here: How to Run a Program in Compatibility Mode in Windows 7


Private Sub Workbook_Open()
Dim LRow As Integer
Dim LResponse As Integer
Dim LName As String
Dim LDiff As Integer
Dim LDays As Integer
LRow = 2
'Warning - Number of days to check for expiration
LDays = 31
'Check the first 200 rows in column C
While LRow < 200
'Only check for expired certificate if value in column C is not blank
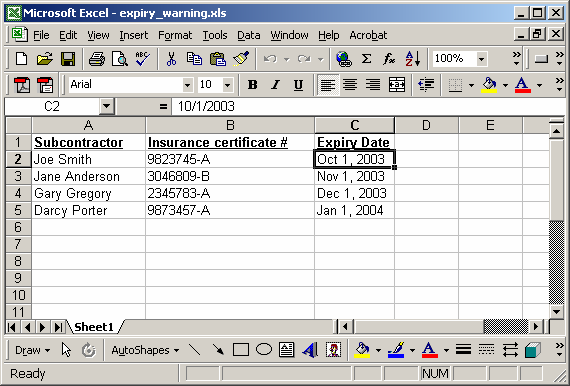
If Len(Sheets("Sheet1").Range("C" & LRow).Value) > 0 Then
LDiff = DateDiff("d", Date, Sheets("Sheet1").Range("C" & LRow).Value)
If (LDiff > 0) And (LDiff <= LDays) Then
'Get subcontractor name
LName = Sheets("Sheet1").Range("A" & LRow).Value
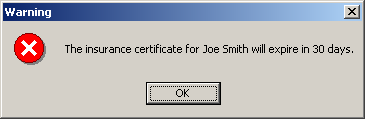
LResponse = MsgBox("The insurance certificate for " & LName & " will expire in " & LDiff & " days.", vbCritical, "Warning")
End If
End If
LRow = LRow + 1
Wend
End Sub
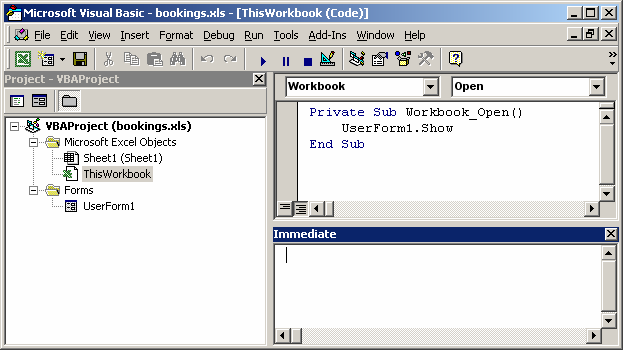
Private Sub Workbook_Open()
   UserForm1.Show
End Sub
បើកកម្មវិធី Excelរួចចុច Alt+F11 ដើម្បីបើក Visual Basic Editorចុច Insert ហើយយក Module ហើយ Copy កូដ ខាងក្រោមចូល
Code:
Option Explicit
'Main Function
Function SpellNumber(ByVal MyNumber)
    Dim Dollars, Cents, Temp
    Dim DecimalPlace, Count
    ReDim Place(9) As String
    Place(2) = " Thousand "
    Place(3) = " Million "
    Place(4) = " Billion "
    Place(5) = " Trillion "
    ' String representation of amount.
    MyNumber = Trim(Str(MyNumber))
    ' Position of decimal place 0 if none.
    DecimalPlace = InStr(MyNumber, ".")
    ' Convert cents and set MyNumber to dollar amount.
    If DecimalPlace > 0 Then
        Cents = GetTens(Left(Mid(MyNumber, DecimalPlace + 1) & _
                  "00", 2))
        MyNumber = Trim(Left(MyNumber, DecimalPlace - 1))
    End If
    Count = 1
    Do While MyNumber <> ""
        Temp = GetHundreds(Right(MyNumber, 3))
        If Temp <> "" Then Dollars = Temp & Place(Count) & Dollars
        If Len(MyNumber) > 3 Then
            MyNumber = Left(MyNumber, Len(MyNumber) - 3)
        Else
            MyNumber = ""
        End If
        Count = Count + 1
    Loop
    Select Case Dollars
        Case ""
            Dollars = "No Dollars"
        Case "One"
            Dollars = "One Dollar"
         Case Else
            Dollars = Dollars & " Dollars"
    End Select
    Select Case Cents
        Case ""
            Cents = " and No Cents"
        Case "One"
            Cents = " and One Cent"
              Case Else
            Cents = " and " & Cents & " Cents"
    End Select
    SpellNumber = Dollars & Cents
End Function

' Converts a number from 100-999 into text
Function GetHundreds(ByVal MyNumber)
    Dim Result As String
    If Val(MyNumber) = 0 Then Exit Function
    MyNumber = Right("000" & MyNumber, 3)
    ' Convert the hundreds place.
    If Mid(MyNumber, 1, 1) <> "0" Then
        Result = GetDigit(Mid(MyNumber, 1, 1)) & " Hundred "
    End If
    ' Convert the tens and ones place.
    If Mid(MyNumber, 2, 1) <> "0" Then
        Result = Result & GetTens(Mid(MyNumber, 2))
    Else
        Result = Result & GetDigit(Mid(MyNumber, 3))
    End If
    GetHundreds = Result
End Function

' Converts a number from 10 to 99 into text.
Function GetTens(TensText)
    Dim Result As String
    Result = ""           ' Null out the temporary function value.
    If Val(Left(TensText, 1)) = 1 Then   ' If value between 10-19...
        Select Case Val(TensText)
            Case 10: Result = "Ten"
            Case 11: Result = "Eleven"
            Case 12: Result = "Twelve"
            Case 13: Result = "Thirteen"
            Case 14: Result = "Fourteen"
            Case 15: Result = "Fifteen"
            Case 16: Result = "Sixteen"
            Case 17: Result = "Seventeen"
            Case 18: Result = "Eighteen"
            Case 19: Result = "Nineteen"
            Case Else
        End Select
    Else                                 ' If value between 20-99...
        Select Case Val(Left(TensText, 1))
            Case 2: Result = "Twenty "
            Case 3: Result = "Thirty "
            Case 4: Result = "Forty "
            Case 5: Result = "Fifty "
            Case 6: Result = "Sixty "
            Case 7: Result = "Seventy "
            Case 8: Result = "Eighty "
            Case 9: Result = "Ninety "
            Case Else
        End Select
        Result = Result & GetDigit _
            (Right(TensText, 1))  ' Retrieve ones place.
    End If
    GetTens = Result
End Function

' Converts a number from 1 to 9 into text.
Function GetDigit(Digit)
    Select Case Val(Digit)
        Case 1: GetDigit = "One"
        Case 2: GetDigit = "Two"
        Case 3: GetDigit = "Three"
        Case 4: GetDigit = "Four"
        Case 5: GetDigit = "Five"
        Case 6: GetDigit = "Six"
        Case 7: GetDigit = "Seven"
        Case 8: GetDigit = "Eight"
        Case 9: GetDigit = "Nine"
        Case Else: GetDigit = ""
    End Select
End Function

Public Sub ExportModules()
    Dim bExport As Boolean
    Dim wkbSource As Excel.Workbook
    Dim szSourceWorkbook As String
    Dim szExportPath As String
    Dim szFileName As String
    Dim cmpComponent As VBIDE.VBComponent

    ''' The code modules will be exported in a folder named.
    ''' VBAProjectFiles in the Documents folder.
    ''' The code below create this folder if it not exist
    ''' or delete all files in the folder if it exist.
    If FolderWithVBAProjectFiles = "Error" Then
        MsgBox "Export Folder not exist"
        Exit Sub
    End If

    On Error Resume Next
        Kill FolderWithVBAProjectFiles & "\*.*"
    On Error GoTo 0

    ''' NOTE: This workbook must be open in Excel.
    szSourceWorkbook = ActiveWorkbook.Name
    Set wkbSource = Application.Workbooks(szSourceWorkbook)

    If wkbSource.VBProject.Protection = 1 Then
    MsgBox "The VBA in this workbook is protected," & _
        "not possible to export the code"
    Exit Sub
    End If

    szExportPath = FolderWithVBAProjectFiles & "\"

    For Each cmpComponent In wkbSource.VBProject.VBComponents

        bExport = True
        szFileName = cmpComponent.Name

        ''' Concatenate the correct filename for export.
        Select Case cmpComponent.Type
            Case vbext_ct_ClassModule
                szFileName = szFileName & ".cls"
            Case vbext_ct_MSForm
                szFileName = szFileName & ".frm"
            Case vbext_ct_StdModule
                szFileName = szFileName & ".bas"
            Case vbext_ct_Document
                ''' This is a worksheet or workbook object.
                ''' Don't try to export.
                bExport = False
        End Select

        If bExport Then
            ''' Export the component to a text file.
            cmpComponent.Export szExportPath & szFileName

        ''' remove it from the project if you want
        '''wkbSource.VBProject.VBComponents.Remove cmpComponent

        End If

    Next cmpComponent

    MsgBox "Export is ready"
End Sub


Public Sub ImportModules()
    Dim wkbTarget As Excel.Workbook
    Dim objFSO As Scripting.FileSystemObject
    Dim objFile As Scripting.File
    Dim szTargetWorkbook As String
    Dim szImportPath As String
    Dim szFileName As String
    Dim cmpComponents As VBIDE.VBComponents

    If ActiveWorkbook.Name = ThisWorkbook.Name Then
        MsgBox "Select another destination workbook" & _
        "Not possible to import in this workbook "
        Exit Sub
    End If

    'Get the path to the folder with modules
    If FolderWithVBAProjectFiles = "Error" Then
        MsgBox "Import Folder not exist"
        Exit Sub
    End If

    ''' NOTE: This workbook must be open in Excel.
    szTargetWorkbook = ActiveWorkbook.Name
    Set wkbTarget = Application.Workbooks(szTargetWorkbook)

    If wkbTarget.VBProject.Protection = 1 Then
    MsgBox "The VBA in this workbook is protected," & _
        "not possible to Import the code"
    Exit Sub
    End If

    ''' NOTE: Path where the code modules are located.
    szImportPath = FolderWithVBAProjectFiles & "\"

    Set objFSO = New Scripting.FileSystemObject
    If objFSO.GetFolder(szImportPath).Files.Count = 0 Then
       MsgBox "There are no files to import"
       Exit Sub
    End If

    'Delete all modules/Userforms from the ActiveWorkbook
    Call DeleteVBAModulesAndUserForms

    Set cmpComponents = wkbTarget.VBProject.VBComponents

    ''' Import all the code modules in the specified path
    ''' to the ActiveWorkbook.
    For Each objFile In objFSO.GetFolder(szImportPath).Files

        If (objFSO.GetExtensionName(objFile.Name) = "cls") Or _
            (objFSO.GetExtensionName(objFile.Name) = "frm") Or _
            (objFSO.GetExtensionName(objFile.Name) = "bas") Then
            cmpComponents.Import objFile.Path
        End If

    Next objFile

    MsgBox "Import is ready"
End Sub

Function FolderWithVBAProjectFiles() As String
    Dim WshShell As Object
    Dim FSO As Object
    Dim SpecialPath As String

    Set WshShell = CreateObject("WScript.Shell")
    Set FSO = CreateObject("scripting.filesystemobject")

    SpecialPath = WshShell.SpecialFolders("MyDocuments")

    If Right(SpecialPath, 1) <> "\" Then
        SpecialPath = SpecialPath & "\"
    End If

    If FSO.FolderExists(SpecialPath & "VBAProjectFiles") = False Then
        On Error Resume Next
        MkDir SpecialPath & "VBAProjectFiles"
        On Error GoTo 0
    End If

    If FSO.FolderExists(SpecialPath & "VBAProjectFiles") = True Then
        FolderWithVBAProjectFiles = SpecialPath & "VBAProjectFiles"
    Else
        FolderWithVBAProjectFiles = "Error"
    End If

End Function

Function DeleteVBAModulesAndUserForms()
        Dim VBProj As VBIDE.VBProject
        Dim VBComp As VBIDE.VBComponent

        Set VBProj = ActiveWorkbook.VBProject

        For Each VBComp In VBProj.VBComponents
            If VBComp.Type = vbext_ct_Document Then
                'Thisworkbook or worksheet module
                'We do nothing
            Else
                VBProj.VBComponents.Remove VBComp
            End If
        Next VBComp
End Function
Sub TestMe()
    MsgBox "Hi there"
End Sub
And a callback looks like this :Sub TestMe(control As IRibbonControl)
MsgBox "Hi there"
End Sub
You will notice that the Application.Run examples above will not work
when you want to run a callback in another workbook or Add-in. Also
Call MyMacroName will not work to call a callback in the same
workbook.Sub test1()
Dim obj As Object
TestMe obj
End Sub
Or to call a callback in an add-in or another workbook use :Sub test2()
Dim obj As Object
Application.Run "'RDBMerge.xlam'!RunRDBMergeForm", obj
End Sub
Note: Instead of a object you can also use
IRibbonControl like this :Sub test3()
Dim IRCdummy As IRibbonControl
TestMe IRCdummy
End Sub
Sub ErrorTest()
    Dim TestWkbk As Workbook
    Dim obj As Object

    Set TestWkbk = Nothing
    On Error Resume Next
    Set TestWkbk = Workbooks("RDBTestAdd-in.xlam")
    On Error GoTo 0

    If TestWkbk Is Nothing Then
        MsgBox "Sorry the File is not open, it is not possible to run the macro." & _
             " But you can add code here to open the workbook or add-in."
    Else
        MsgBox "Use one of the two lines below to call the callback or macro"

        'Run a callback in a Excel 2007-2013 workbook/add-in
        'Application.Run "'" & TestWkbk.Name & "'!RunMyMacro", obj

        'If you want to run a macro in a Excel 97-2013 workbook/add-in use
        'Application.Run "'" & TestWkbk.Name & "'!RunMyMacro"

    End If
End Sub
Tip: You could replace the MsgBox that says that the file is not open
with code that opens the workbook/add-in. Set TestWkbk
= Workbooks.Open("C:\YourPathToTheAddin\RDBTestAdd-in.xlam")Function IsOpen(WBname As String) As Boolean
Dim wb As Workbook
On Error Resume Next
Set wb = Workbooks(WBname)
If Err = 0 Then IsOpen = True
End Function
But how do we use this function if it is not in the same workbook, you
can use this to check if there is a file named RDBMerge.xlam open.


Public Sub Test()
    MsgBox "Insert your favorite code here"
End Sub
1) Select the PERSONAL.XLS(b) in the project window and click on the +
before itPublic Function IsoWeekNum(d1 As Date) As Integer
' Daniel Maher
Dim d2 As Long
d2 = DateSerial(Year(d1 - Weekday(d1 - 1) + 4), 1, 3)
IsoWeekNum = Int((d1 - d2 + Weekday(d2) + 5) / 7)
End Function
1) Select the PERSONAL.XLS(b) in the project window and click on the +
before it


